Learning Objectives
After completing this lesson, you'll be able to:
- Determine when to use automation parameters and output attributes.
- Use output attributes in downstream actions.
- Configure an automation to run a workspace in response to a trigger.
In this lesson, you will:
- Optional: Watch a demonstration video (if you have not attended the live training).
- Scroll down to read the activity instructions below and follow the steps in your lab.
- Complete the quiz at the end of this lesson.
- Click 'Next' to mark the lesson complete.
Learning Objectives
After completing this lesson, you'll be able to:
- Determine when to use automation parameters and output attributes.
- Use output attributes in downstream actions.
- Configure an automation to run a workspace in response to a trigger.
In this lesson, you will:
- Optional: Watch a demonstration video (if you have not attended the live training).
- Scroll down to read the activity instructions below and follow the steps in your lab.
- Complete the quiz at the end of this lesson.
- Click 'Next' to mark the lesson complete.
Resources
Controlling Workflows with Parameters
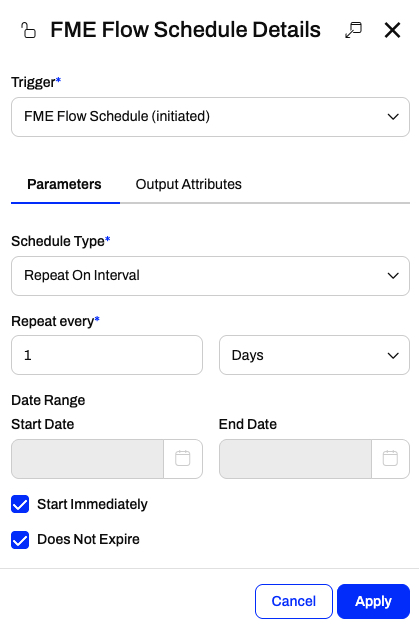
FME Flow Automations rely on sending messages between triggers and actions. When configuring triggers and actions, you use parameters to customize how they run and process data. For example, an FME Flow Schedule trigger has parameters for the Schedule Type and how often the schedule should run, which you provide values to control how the trigger functions.
When you configure a Run a Workspace action, the workspace's user parameters appear, allowing you to customize its behavior.
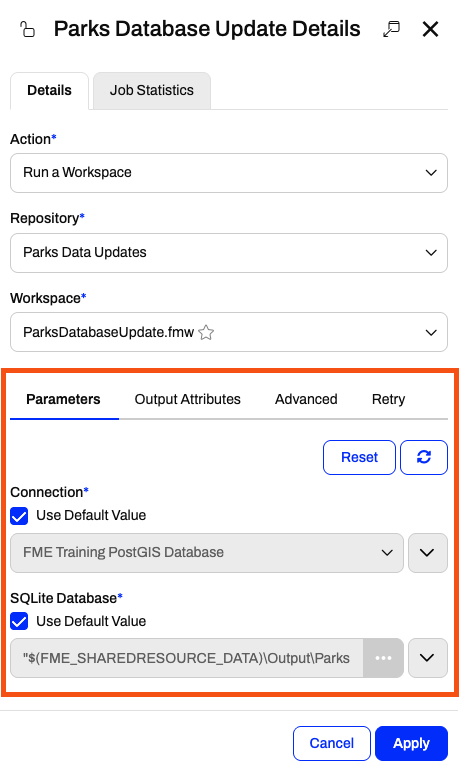
The values you enter for a trigger's or an action's parameters will control how the node runs. The value you enter will depend on the parameter type and what FME Flow expects as input for the parameter. For example, FME Flow has you pick a connection for a connection parameter. Source and destination dataset parameters accept file paths or URLs to web-based datasets.
Automation Parameters
Automation Parameters are global to an automation. They allow you to reference a value multiple times at multiple components of your workflow without explicitly defining it each time.
You create and edit automation parameters in the Automation Parameters Editor, which you open from the automations toolbar.

You may also open the editor to create Automation Parameters directly from parameter inputs.
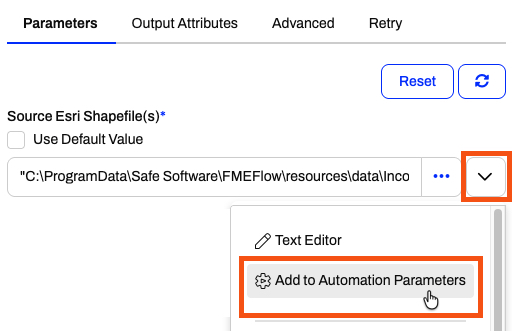
Every automation parameter begins with the global. prefix followed by the parameter name. When you reference this key, FME Flow will use the value saved to the parameter. For example, you create the SourceDataset_SHAPEFILE parameter that you will use in a source dataset parameter for a workspace. For the workspace source dataset parameter, you enter global.SourceDataset_SHAPEFILE, and the workspace will read from the file path value.
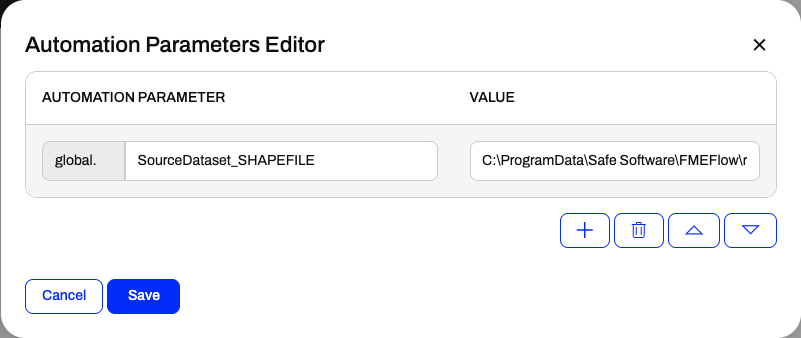
Automation Parameters are reusable throughout an automation. You may reference them multiple times across multiple nodes. If the value changes, update it in the Automation Parameters Editor, and your workflow uses the new value anywhere it references the parameter. You do not have to update a value multiple times across your automation, which helps prevent errors if you forget to update a parameter.
Output Attributes
Automations function by passing JSON-formatted messages between components and nodes. When a trigger receives a message to kick off the automation, it passes the message to the next action, triggering it to run. Once the action completes, it passes another message to the following actions. While it is possible to parse key pieces of information from the entire JSON message, FME Flow makes this task easier by extracting key-value pairs from the JSON messages and creating attributes. In automations, you can link these attributes to parameter values in downstream actions to further control how they function based on information from upstream in the automation.
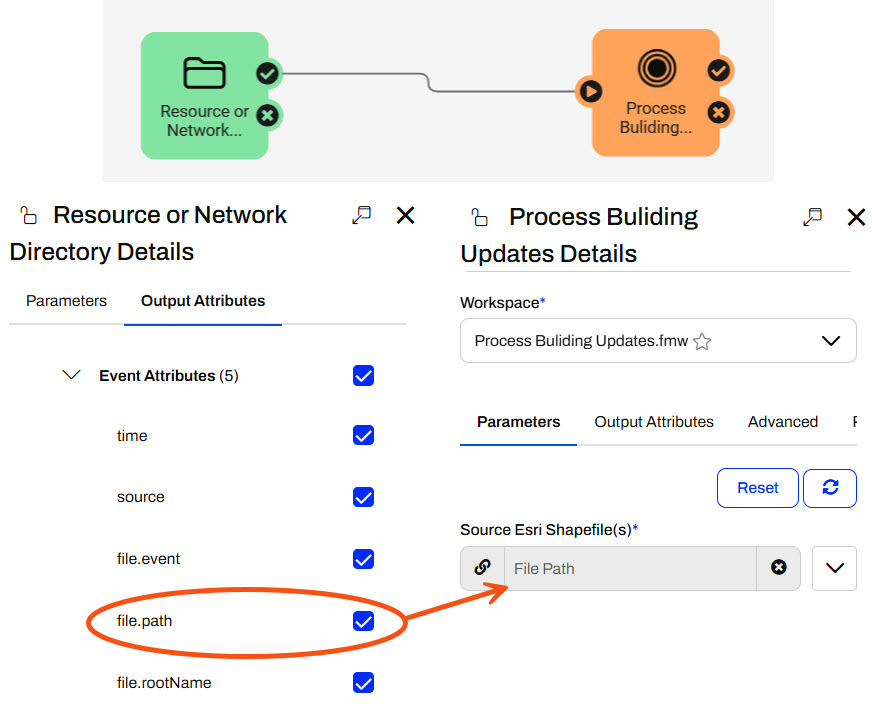
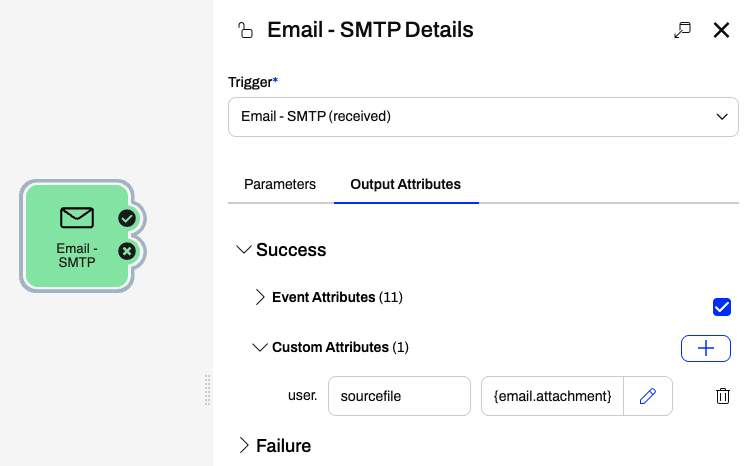
Each trigger and action has pre-set Output Attributes, called Event Attributes, specific to its type. You may reference Output Attributes in action parameters downstream from the trigger or action that creates the attribute. Be cautious if multiple actions produce the same attribute values - FME Flow only stores one value per attribute, so the value from the second action will overwrite the value from the first. If you need values from multiple actions, create Custom Attributes and provide a unique key for each action. Custom Attributes are Output Attributes you define manually, meaning you make the attribute name and assign a value to it.
Exercise

Jennifer continues with her Incoming Building Footprints automation. So far, you've helped Jennifer trigger the automation when someone adds or updates files in the BuildingUpdates folder. Now, Jennifer needs to use a Filter messages action and a Run a Workspace action to process each shapefile and update the geodatabase.
In this exercise, you will:
- Publish Jennifer's workspace that reads shapefiles and updates the geodatabase to FME Flow, and add it to the automation.
- Use a Filter messages action to filter the trigger output messages.
- Trigger the automation to process each shapefile of updates and update the geodatabase.
1) Open and Run Starting Workspace
- Open the starting workspace (C:\FMEData\Workspaces\AutomateWorkflowsWithFMEFlow\process-incoming-data.fmw) in FME Workbench.
- Run the workspace.
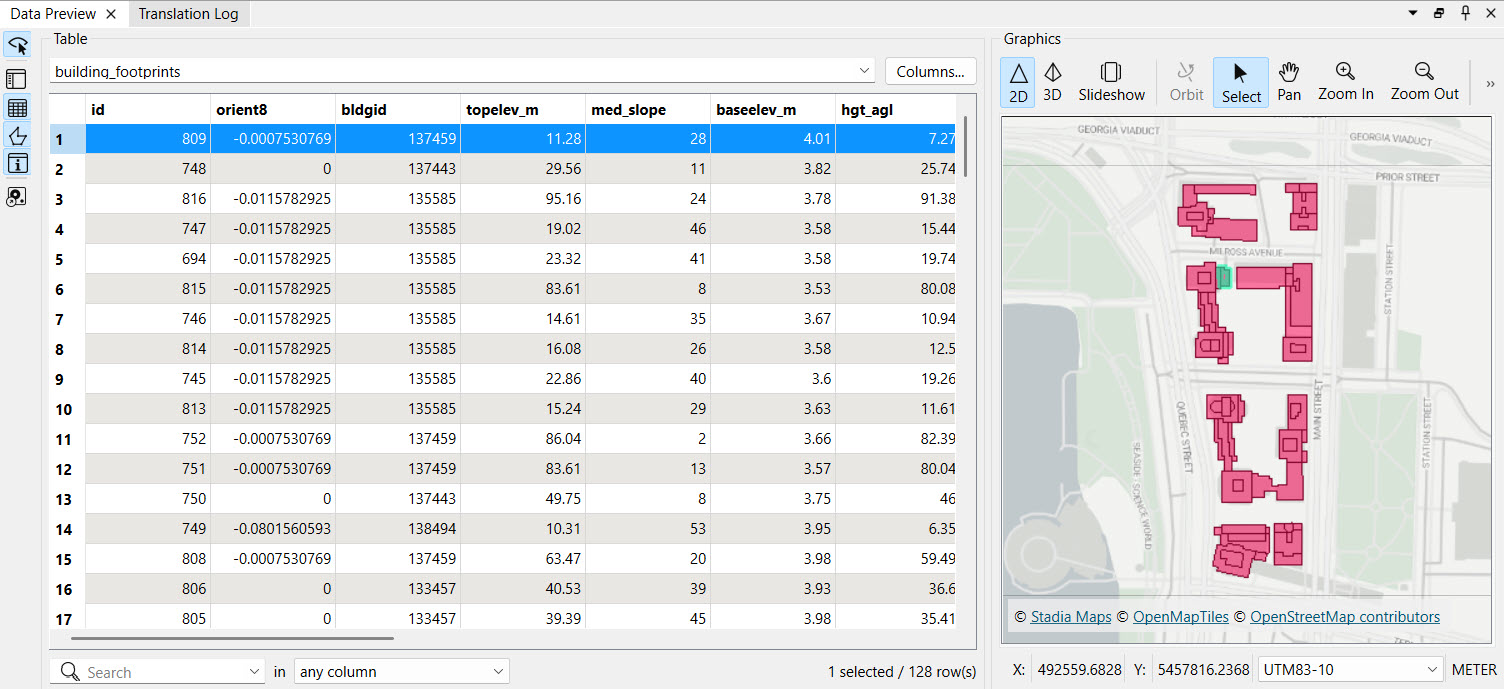
- Once the translation is complete, select the writer and then click the View Written Data icon.
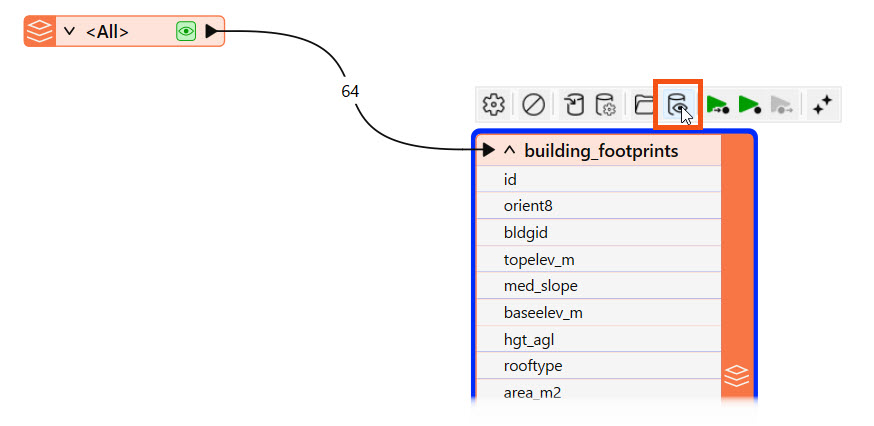
- Observe the written data in the Data Preview window.
2) Publish to FME Flow
The workspace processes the building updates as expected, so it is ready to deploy to FME Flow.
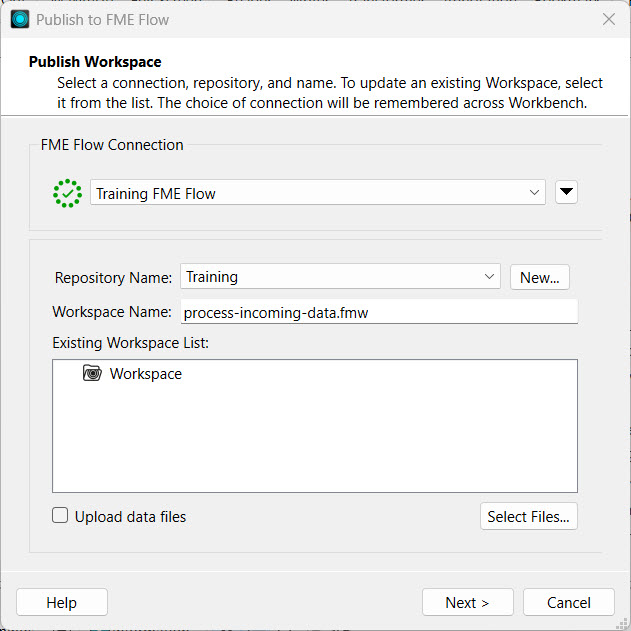
- Click Publish to open the publishing wizard.

- Ensure FME Workbench successfully connects to FME Flow.
- Select the Training repository.
- If the Training repository does not exist, click New... to create it. She ensures FME Workbench successfully connects to FME Flow, creates the Training repository for the workspace, and clicks Next.
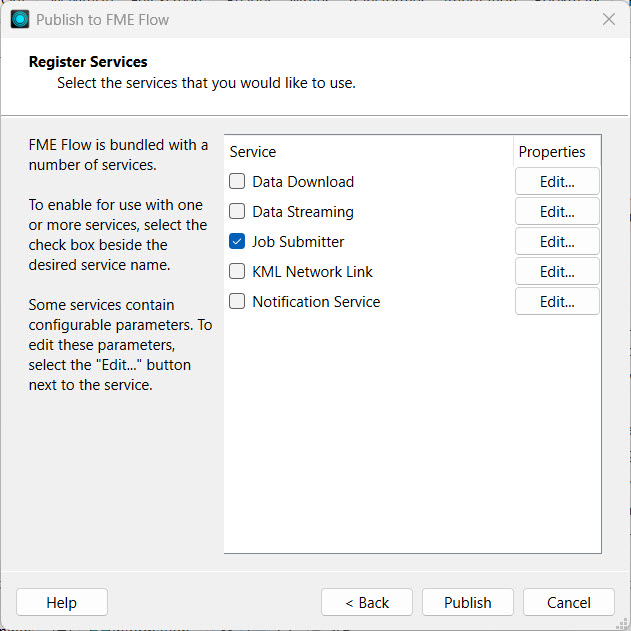
- Register the workspace with the Job Submitter service and click Publish.
- Check the Translation Log to ensure FME published the workspace successfully.
- Navigate to FME Flow.
3) Upload Geodatabase

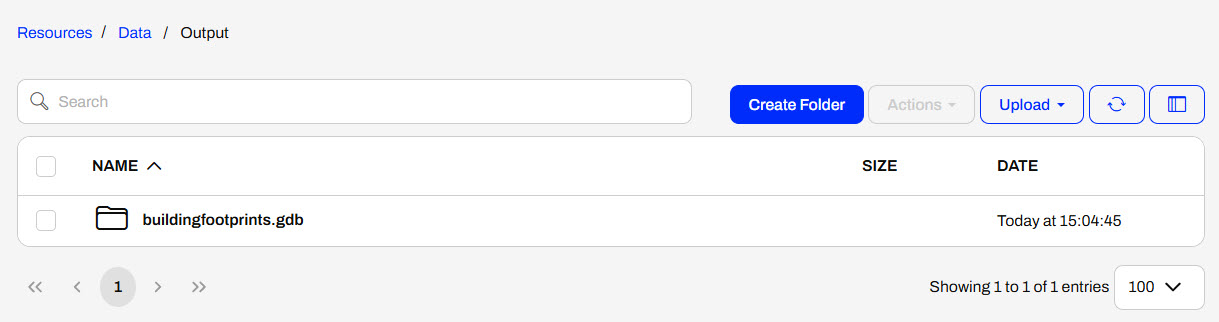
If the buildingfootprints.gdb already exists in Resources > Data > Output, you may skip this step and move on to Step 4.
When you ran the workspace on FME Workbench, FME wrote the destination geodatabase to the local computer. Jennifer wants others to be able to access the geodatabase containing all the building updates for their workflows on FME Flow.
- Open Resources > Data > Output.
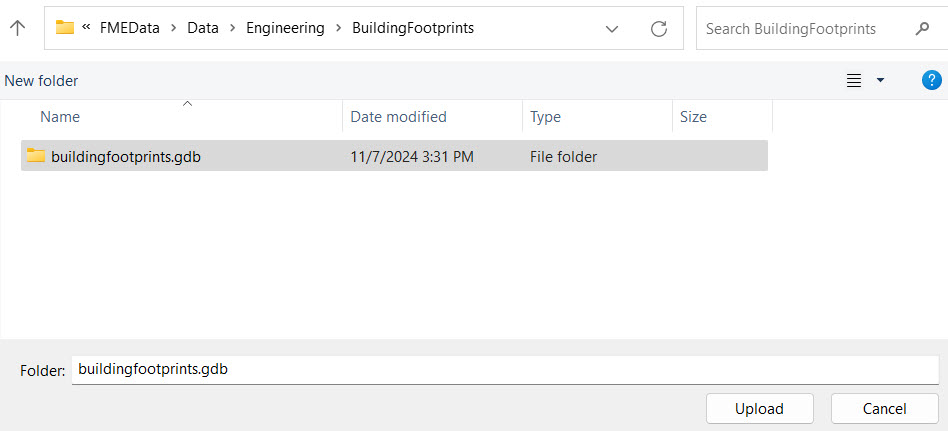
- Click Upload and select Folder.
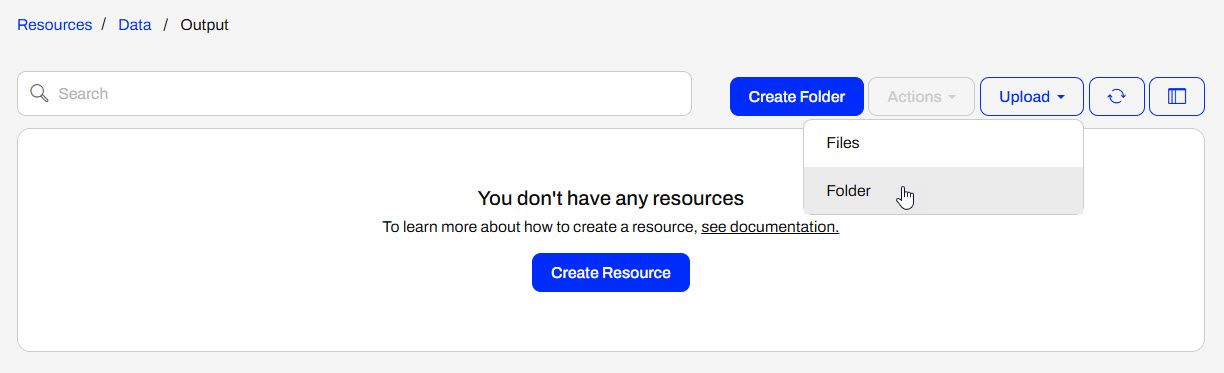
- Navigate to C:\FMEData\Data\Engineering\BuildingFootprints\ and select buildingfootprints.gdb to upload.
4) Stop Automation
- Navigate back to the Incoming Building Footprints automation.
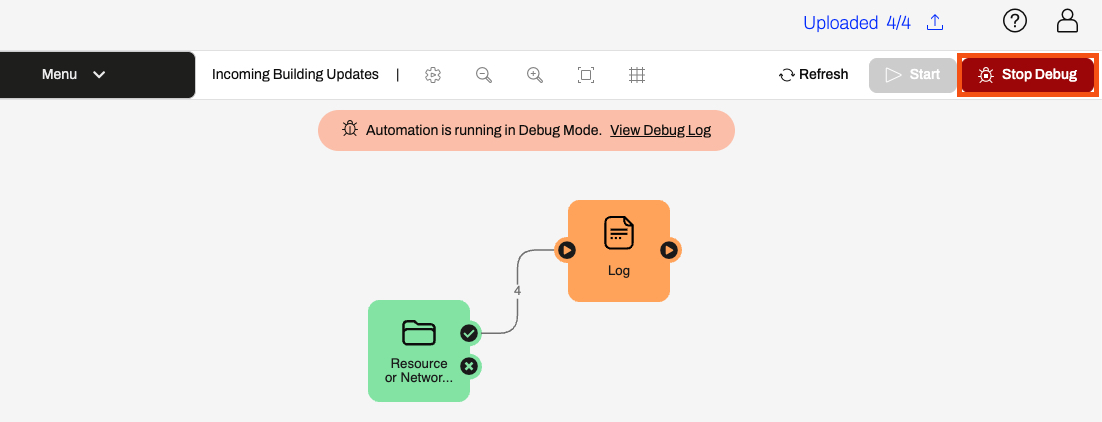
- Click Stop Debug.
- The Automation stops polling the BuildingUpdates folder for creations and modifications, and allows you to edit the nodes.
5) Filter Messages
- Open the Log action details.
- Either double-click the node or click the icon in the center to open the Log Details.
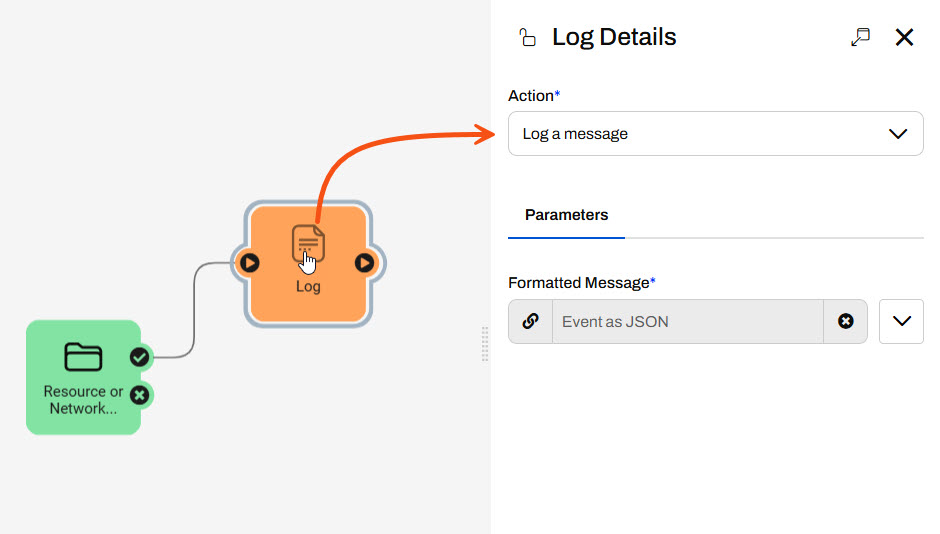
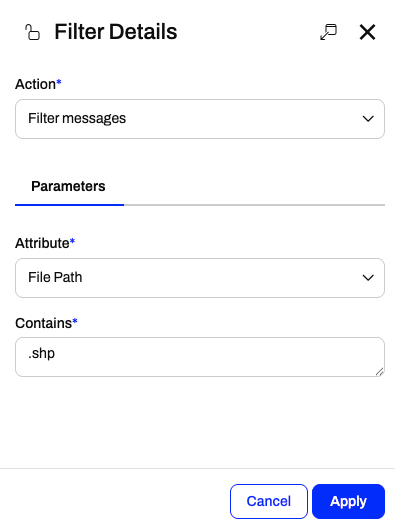
- Change the Action to Filter messages.
- For the Attribute parameter, select File Path from the drop-down.
- Enter .shp for the Contains parameter.
- FME Flow will filter the event file path for .shp files only. Since shapefiles contain four files, FME Flow sends four CREATE events from the trigger, and this workflow only requires one event to trigger for each shapefile.
- Click Apply to update the action and close the Filter Details.
6) Add a Workspace Action
- Attach an internal action to the Filter success port.
- Configure it to run the process-incoming-data.fmw workspace you published to the Training repository.
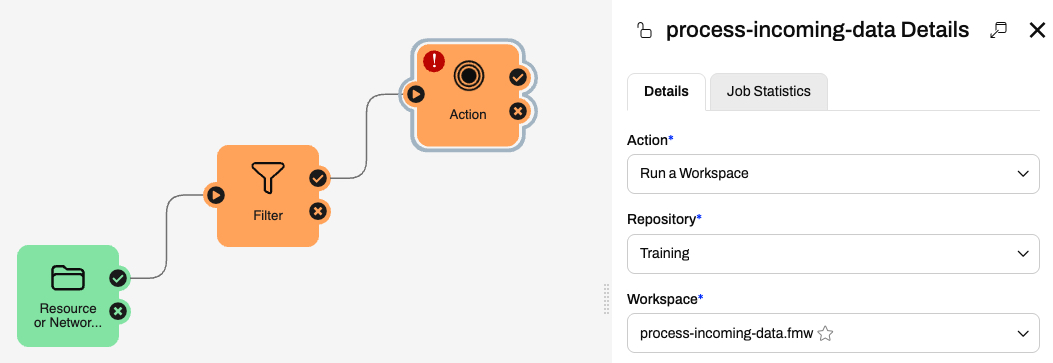
Next, configure the workspace parameters.
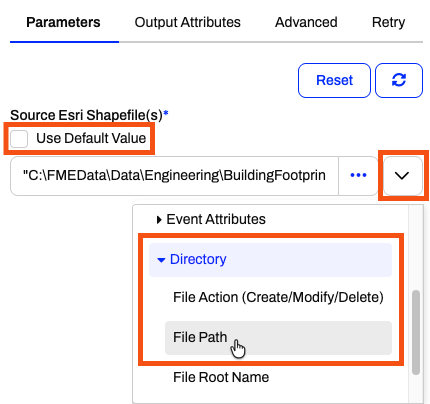
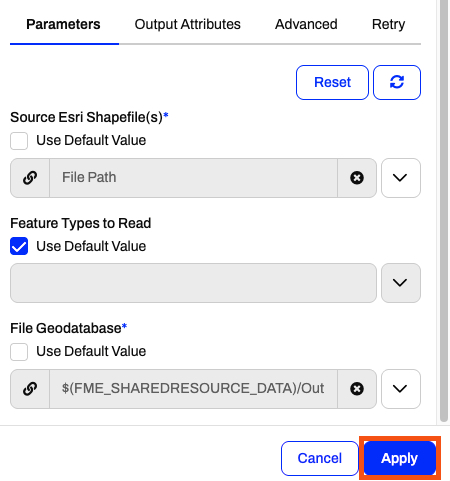
- For Source Esri Shapefile(s), deselect Use Default Value, then open the parameter drop-down, expand Directory, and select the File Path attribute.
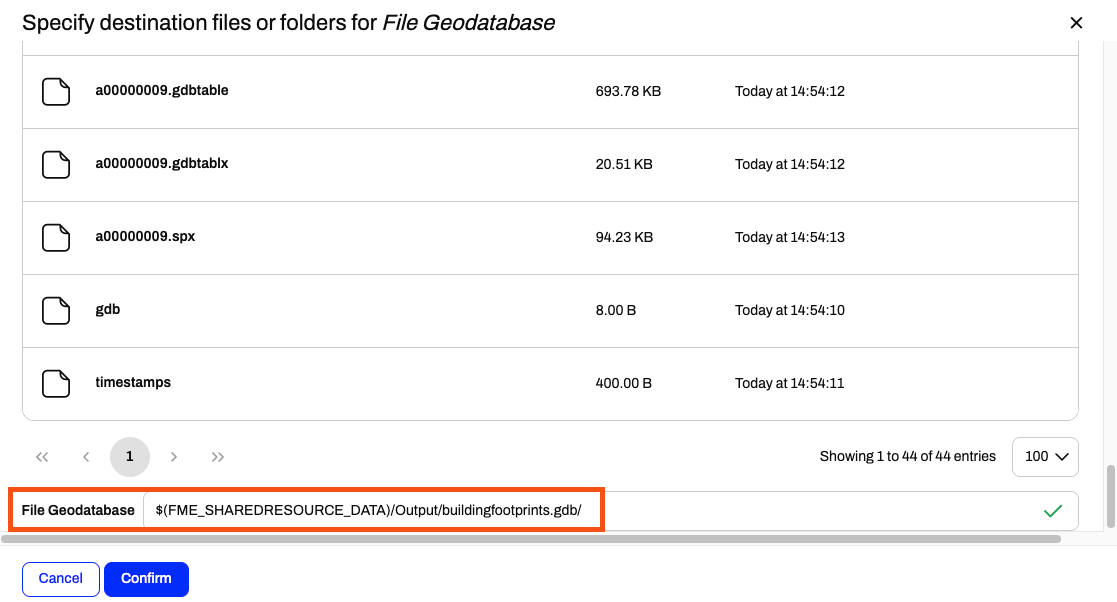
- For the File Geodatabase parameter, also deselect the Use Default Value option. Then, click the ellipsis and navigate to the buildingfootprints.gdb in Resources.
- Click Apply to save the workspace details and close the pane.
7) Start Automation
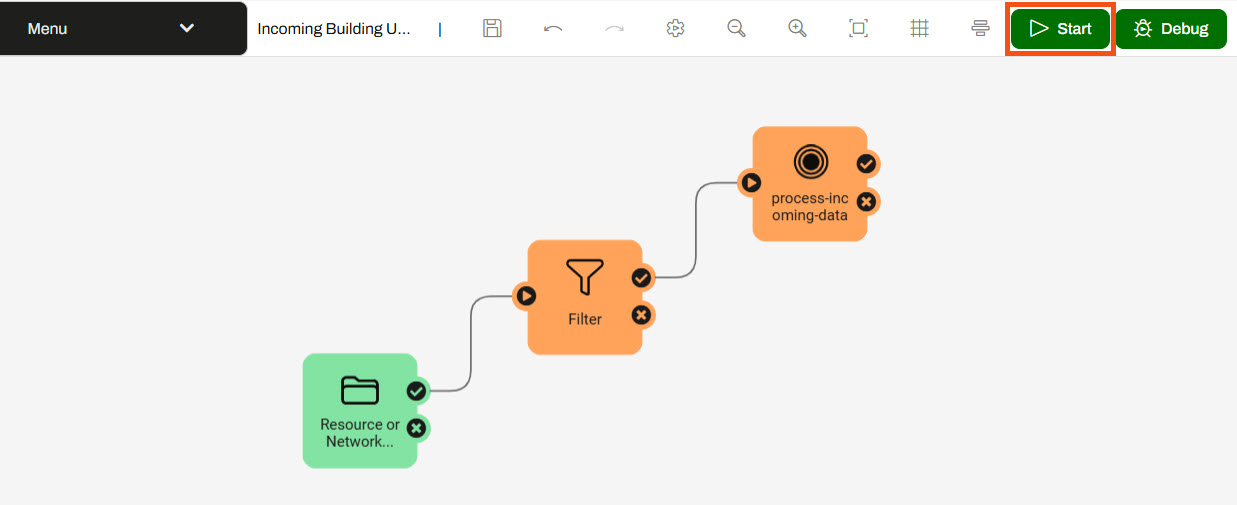
- Save the updated automation.
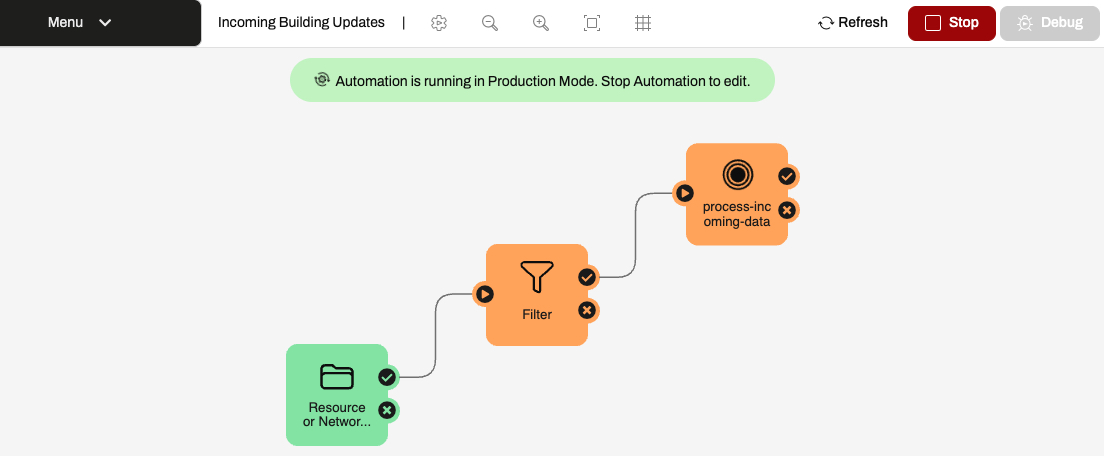
- Click Start to run the automation, this time in Production Mode.
- You will likely receive a pop-up warning about running the automation in Production Mode. Click Start to continue.
8) Test Automation
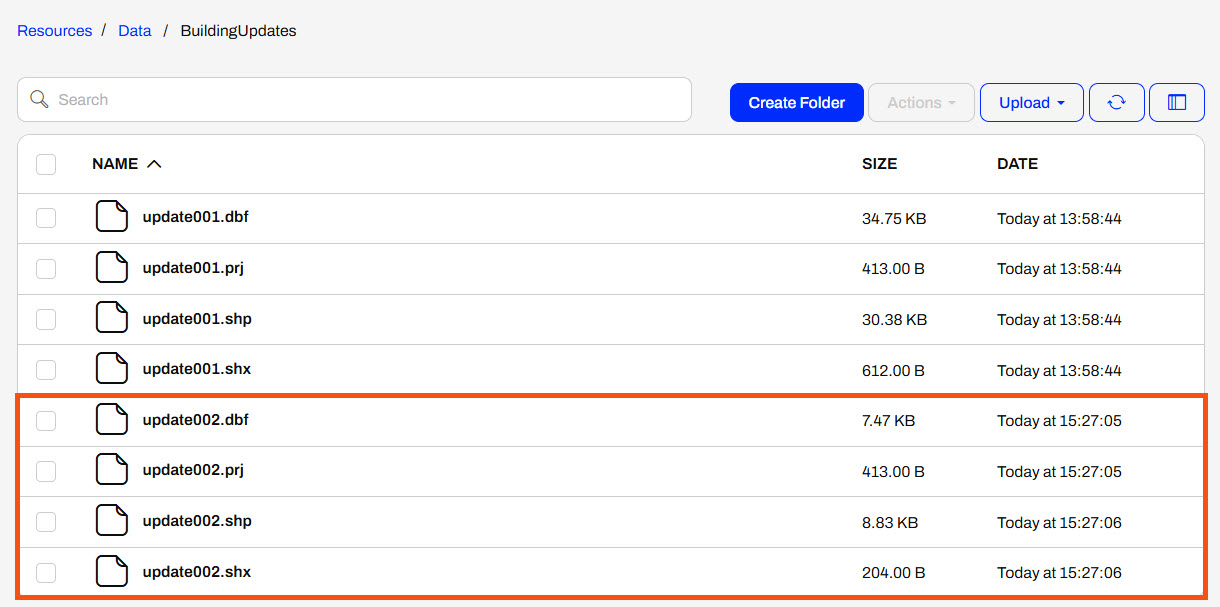
- Go to Resources and open the BuildingUpdates folder.
- Upload another shapefile of updates. Click Upload and select Files. Select all four files that comprise a shapefile of updates (C:\FMEData\Data\Engineering\BuildingFootprints).
- Return to the automation and see that the message counts reflect the shapefile you uploaded, and that only one message passes the Filter action to the workspace.
- If the event counts do not update automatically, click Refresh on the top toolbar.
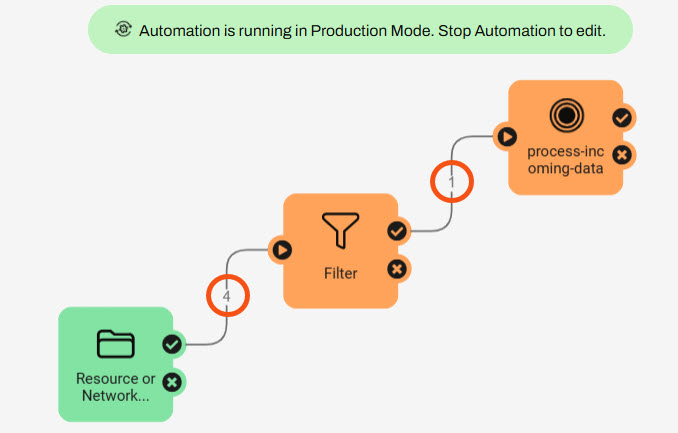
9) View Triggered Jobs
Now, check the job of the workspace that ran in the automation.
- Open the Menu and select View Triggered Jobs.
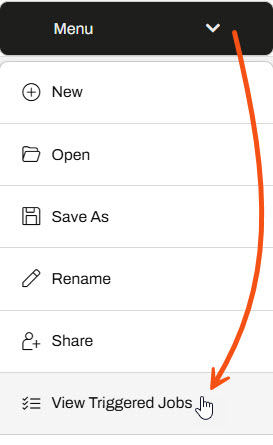
The FME Flow Jobs page opens and shows the jobs completed by this automation. Notice whether your workspace ran successfully.
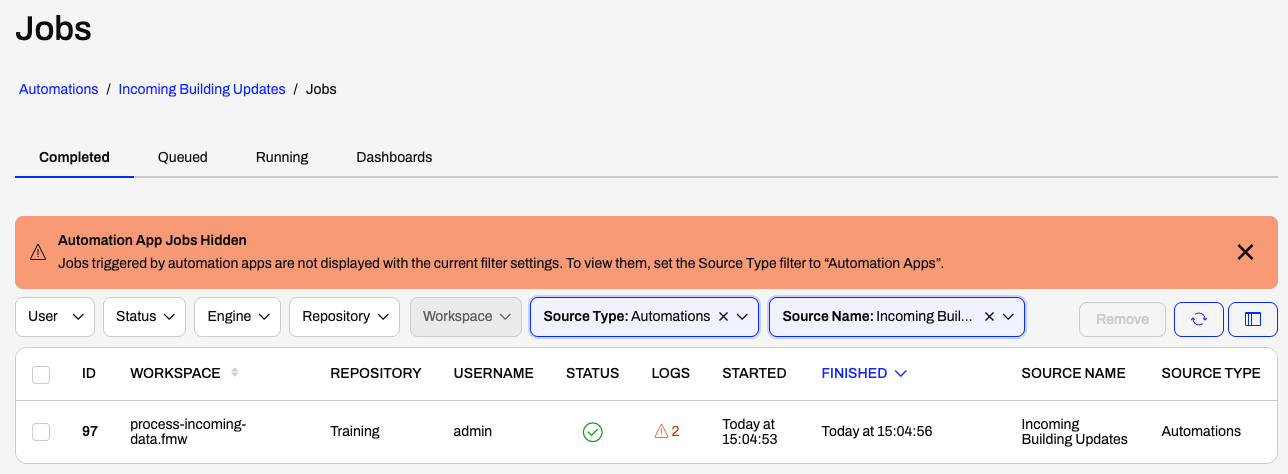
10) Optional: Inspect Output
- Return to the buildingfootprints.gdb in Resources.
- Check that the timestamp was recently updated, which indicates that the workspace just updated the data.
- Click the box to select the geodatabase, then expand the Actions options, and select Download.
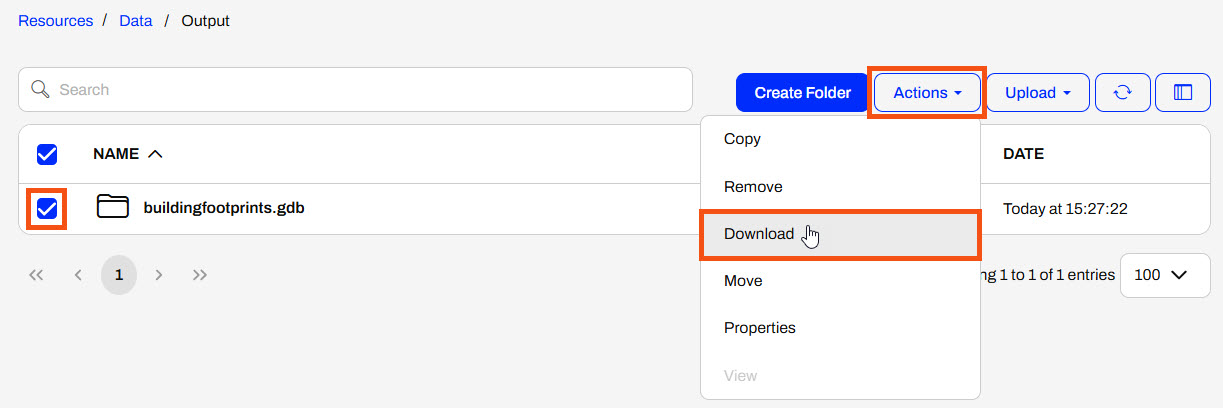
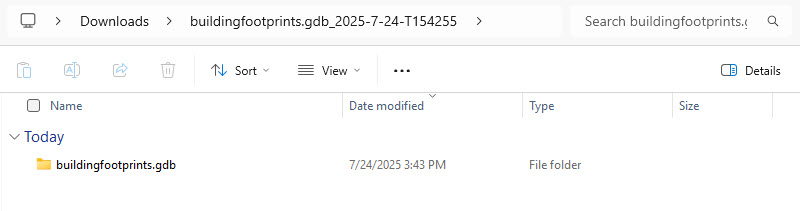
- In the File Explorer, open the Downloads folder, then extract the zip file containing the geodatabase.
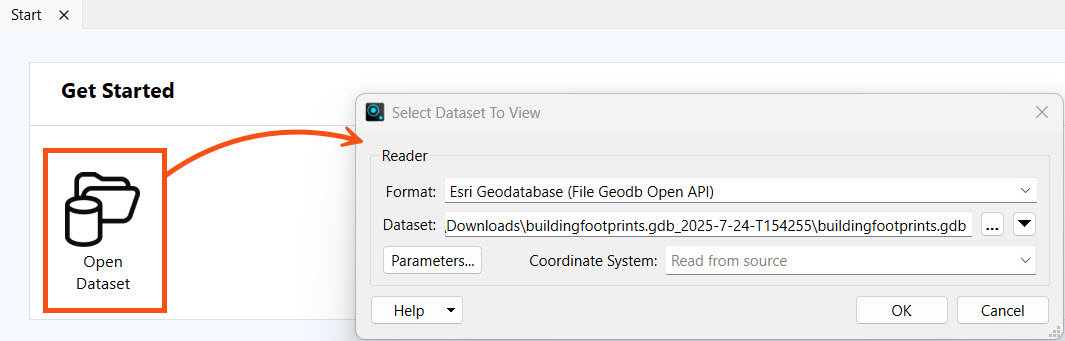
- Next, open FME Data Inspector and click Open Dataset from the Get Started section.
- For Format, select Esri Geodatabase (OpenFile Geodb) and then select the extracted geodatabase in Downloads.
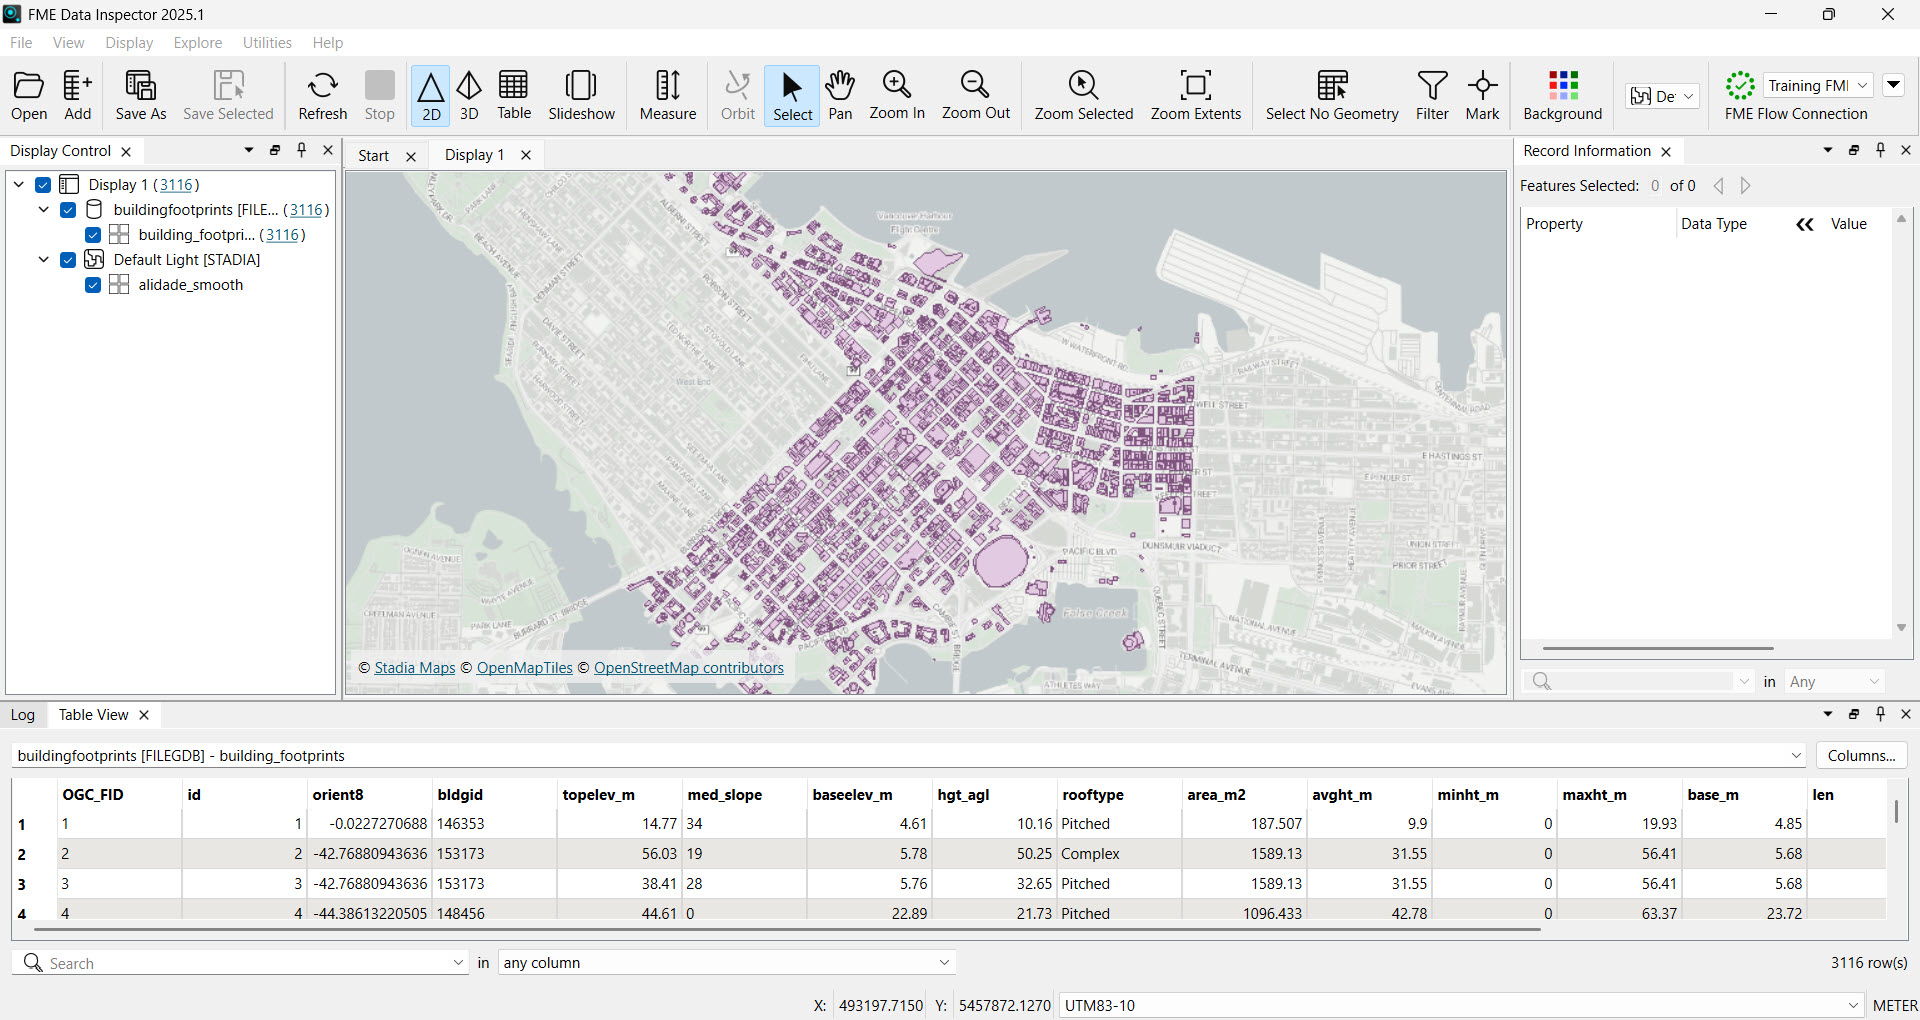
- Click OK, and the data opens in Data Inspector.
Resources
Controlling Workflows with Parameters
FME Flow Automations rely on sending messages between triggers and actions. When configuring triggers and actions, you use parameters to customize how they run and process data. For example, an FME Flow Schedule trigger has parameters for the Schedule Type and how often the schedule should run, which you provide values to control how the trigger functions.
When you configure a Run a Workspace action, the workspace's user parameters appear, allowing you to customize its behavior.
The values you enter for a trigger's or an action's parameters will control how the node runs. The value you enter will depend on the parameter type and what FME Flow expects as input for the parameter. For example, FME Flow has you pick a connection for a connection parameter. Source and destination dataset parameters accept file paths or URLs to web-based datasets.
Automation Parameters
Automation Parameters are global to an automation. They allow you to reference a value multiple times at multiple components of your workflow without explicitly defining it each time.
You create and edit automation parameters in the Automation Parameters Editor, which you open from the automations toolbar.
You may also open the editor to create Automation Parameters directly from parameter inputs.
Every automation parameter begins with the global. prefix followed by the parameter name. When you reference this key, FME Flow will use the value saved to the parameter. For example, you create the SourceDataset_SHAPEFILE parameter that you will use in a source dataset parameter for a workspace. For the workspace source dataset parameter, you enter global.SourceDataset_SHAPEFILE, and the workspace will read from the file path value.
Automation Parameters are reusable throughout an automation. You may reference them multiple times across multiple nodes. If the value changes, update it in the Automation Parameters Editor, and your workflow uses the new value anywhere it references the parameter. You do not have to update a value multiple times across your automation, which helps prevent errors if you forget to update a parameter.
Output Attributes
Automations function by passing JSON-formatted messages between components and nodes. When a trigger receives a message to kick off the automation, it passes the message to the next action, triggering it to run. Once the action completes, it passes another message to the following actions. While it is possible to parse key pieces of information from the entire JSON message, FME Flow makes this task easier by extracting key-value pairs from the JSON messages and creating attributes. In automations, you can link these attributes to parameter values in downstream actions to further control how they function based on information from upstream in the automation.
Each trigger and action has pre-set Output Attributes, called Event Attributes, specific to its type. You may reference Output Attributes in action parameters downstream from the trigger or action that creates the attribute. Be cautious if multiple actions produce the same attribute values - FME Flow only stores one value per attribute, so the value from the second action will overwrite the value from the first. If you need values from multiple actions, create Custom Attributes and provide a unique key for each action. Custom Attributes are Output Attributes you define manually, meaning you make the attribute name and assign a value to it.
Exercise
Jennifer continues with her Incoming Building Footprints automation. So far, you've helped Jennifer trigger the automation when someone adds or updates files in the BuildingUpdates folder. Now, Jennifer needs to use a Filter messages action and a Run a Workspace action to process each shapefile and update the geodatabase.
In this exercise, you will:
- Publish Jennifer's workspace that reads shapefiles and updates the geodatabase to FME Flow, and add it to the automation.
- Use a Filter messages action to filter the trigger output messages.
- Trigger the automation to process each shapefile of updates and update the geodatabase.
1) Open and Run Starting Workspace
- Open the starting workspace (C:\FMEData\Workspaces\AutomateWorkflowsWithFMEFlow\process-incoming-data.fmw) in FME Workbench.
- Run the workspace.
- Once the translation is complete, select the writer and then click the View Written Data icon.
- Observe the written data in the Data Preview window.
2) Publish to FME Flow
The workspace processes the building updates as expected, so it is ready to deploy to FME Flow.
- Click Publish to open the publishing wizard.
- Ensure FME Workbench successfully connects to FME Flow.
- Select the Training repository.
- If the Training repository does not exist, click New... to create it. She ensures FME Workbench successfully connects to FME Flow, creates the Training repository for the workspace, and clicks Next.
- Register the workspace with the Job Submitter service and click Publish.
- Check the Translation Log to ensure FME published the workspace successfully.
- Navigate to FME Flow.
3) Upload Geodatabase
If the buildingfootprints.gdb already exists in Resources > Data > Output, you may skip this step and move on to Step 4.
When you ran the workspace on FME Workbench, FME wrote the destination geodatabase to the local computer. Jennifer wants others to be able to access the geodatabase containing all the building updates for their workflows on FME Flow.
- Open Resources > Data > Output.
- Click Upload and select Folder.
- Navigate to C:\FMEData\Data\Engineering\BuildingFootprints\ and select buildingfootprints.gdb to upload.
4) Stop Automation
- Navigate back to the Incoming Building Footprints automation.
- Click Stop Debug.
- The Automation stops polling the BuildingUpdates folder for creations and modifications, and allows you to edit the nodes.
5) Filter Messages
- Open the Log action details.
- Either double-click the node or click the icon in the center to open the Log Details.
- Change the Action to Filter messages.
- For the Attribute parameter, select File Path from the drop-down.
- Enter .shp for the Contains parameter.
- FME Flow will filter the event file path for .shp files only. Since shapefiles contain four files, FME Flow sends four CREATE events from the trigger, and this workflow only requires one event to trigger for each shapefile.
- Click Apply to update the action and close the Filter Details.
6) Add a Workspace Action
- Attach an internal action to the Filter success port.
- Configure it to run the process-incoming-data.fmw workspace you published to the Training repository.
Next, configure the workspace parameters.
- For Source Esri Shapefile(s), deselect Use Default Value, then open the parameter drop-down, expand Directory, and select the File Path attribute.
- For the File Geodatabase parameter, also deselect the Use Default Value option. Then, click the ellipsis and navigate to the buildingfootprints.gdb in Resources.
- Click Apply to save the workspace details and close the pane.
7) Start Automation
- Save the updated automation.
- Click Start to run the automation, this time in Production Mode.
- You will likely receive a pop-up warning about running the automation in Production Mode. Click Start to continue.
8) Test Automation
- Go to Resources and open the BuildingUpdates folder.
- Upload another shapefile of updates. Click Upload and select Files. Select all four files that comprise a shapefile of updates (C:\FMEData\Data\Engineering\BuildingFootprints).
- Return to the automation and see that the message counts reflect the shapefile you uploaded, and that only one message passes the Filter action to the workspace.
- If the event counts do not update automatically, click Refresh on the top toolbar.
9) View Triggered Jobs
Now, check the job of the workspace that ran in the automation.
- Open the Menu and select View Triggered Jobs.
The FME Flow Jobs page opens and shows the jobs completed by this automation. Notice whether your workspace ran successfully.
10) Optional: Inspect Output
- Return to the buildingfootprints.gdb in Resources.
- Check that the timestamp was recently updated, which indicates that the workspace just updated the data.
- Click the box to select the geodatabase, then expand the Actions options, and select Download.
- In the File Explorer, open the Downloads folder, then extract the zip file containing the geodatabase.
- Next, open FME Data Inspector and click Open Dataset from the Get Started section.
- For Format, select Esri Geodatabase (OpenFile Geodb) and then select the extracted geodatabase in Downloads.
- Click OK, and the data opens in Data Inspector.